Posts

Showing posts from September, 2024

Hydraulic buffers

Image
Buffers are there to stop locos and rolling stock coming off the end of the track. Hydraulic buffers give a degree of extra protection by absorbing some of the energy of the collision. They are fairly rare, but I came across a pair on Crewe station on the bay platforms on the north side. I do not know how hydraulic buffers work, but I guess... The red cylinders are hydraulic pistons full of oil. On impact, slides into the piston, forcing the oil into the reservoir - the blue tank - via an orifice. The orifice restricts the flow, arresting the speed of the impact. How effective they are I do not know. Hard to see how a 100 te train travelling at 40 mph is going to be stopped. As far as I can tell, there is no hydraulic buffer available in N gauge. I did a single buffer, then mirrored it in ChiTuBox. If I print out more, I would do the buffers and sliders separate so they can be readily replaced if the snap.

At Exhibitions

Image
Some of my designs have been getting onto exhibition layouts. This page is an on-going log of sightings. Coketown at Leigh, 15/Sep/24 The wagonloads are my design, some printed by my, some by the layout owner. Wolverhampton Low Level at North Fylde, 21/Sep/24 The finishing touches were added to this layout just the day before! The bridge is mine; painted by the layout owner. One of the trolleys is also mine, and the name plate. Divorce Lane at North Fylde, 21/Sep/24 In contrast to the last one, this layout is over twenty years old. Three of the containers are mine - the MEGC in the centre, the Guinness Tanktainer above and right of that, and the Cutty sark tanktainer that is pretty much obscured by the crane.

The ELR Bridge over the Ribble - The Model

Image
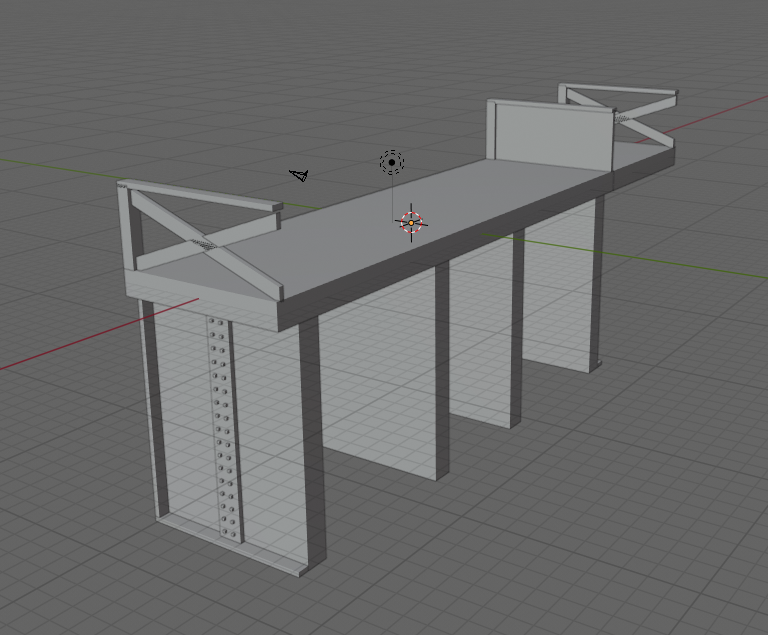
The prototype is discussed elsewhere . This has been a long time in development, and bits were printed some time ago. It is now coming together! Due to limited space, there is only one pier, and the height is reduced to fit. The abutments and pier are decorative - they are not intended to take weight. Instead, tracks will be supported by two aluminium U tubes, held up be wood at each end. The deck is made up of repeating sections that look like this in Blender: Eight are joined together to form one section for printing, and four of these are required. Each section is slid over the aluminium U tubes. At each end, there is an additional unit, plus an extension to the end of the U tube - the wooden supports go under that. The pier and abutments were printed in parts - an upper section and a lower section. The steps and curve of the arch were further parts. The image shows them after painting. The pier will be stood in the river, so is longer, which is why the section slopes! And here it i

What do you use for...?

Occasionally I get asked what I use for resin or whatever, so here I reveal all! Printer I use an Elegoo Saturn 8K. It is a decent price, and the resolution is good enough that you do not lines, even when printing curves such as on a tank wagon. That said, Elegoo do a more recent version of the Saturn, and if I was buying one now, I would use that, because of the extra convenience features. Resin I use Elegoo Standard 2.0 grey. I started with this as it is the printer manufacturer's resin, so should be tailored to the machine, and it works well, so I have stuck with it. If you buy a pack on 10 bottles it is about £16/kg. I have used about 15 kg in 18 months. Wash I use IPA. It is non-toxic, and low flammability. If you use water, you still have to dispose of the waste afterwards; you might as well do that with IPA and recycle it. I have used about 10 l in 18 months. Glue I generally use superglue to stick parts together, though if there is a large surface area I will use UHU. Paint

Wylam Signal Box

Image
Wylam signal box is distinctive as it is built across the tracks; it is Grade II listed . This style was quite popular on the line from Carlisle to Newcastle, and two still exist, the other at Hexham. The Wylam example is excellent because you can get so close. The station is split either side of a level crossing, with the signal box right in the middle there too. It makes for an impressive model. Overhead signal boxes presumably had the advantage of using less land, making them cheaper, and give a better view presumably, but I would guess the rods connecting to points are more complicated, with an extra three or so joints. Wylam signal box is about 20' deep, and 42' across. I am guessing about 40' high, with 16' clearance. The Hexham signal box, which I visited the same day, is a little bigger. It spans three lines, and controls a rather bigger station. This is as close as I could get (and my phone camera has no zoom!).

K6 Telephone Box

Image
The Post Office (GPO) produced a number of phone boxes, K1 to K8, then KX100 (where K stands for Kiosk). The distinctive red phone boxes are the K4 and the K6; the K4 having glass panels all the same size, while the K6 has wider central panes and much narrow panes either side. The K6 is also slightly smaller. Around 60,000 K6 units were built from 1936 into the 1960s. The box is about 8' high and 3' wide, which works out at 16 mm in N gauge, so this is a tiny model. I wanted glazed windows, and interior detail, which means making it in pieces, so despite the small size, that made six parts. Once printed, I realised that was just not practical, so abandoned any idea of glazing it, and did it in two parts, the kiosk and the base. The prototype is quite rare nowadays, but they are still around - usually repurposed. This one is at Blanchland, in Northumberland, and I guess has been preserved.

Trolleys

Image
All sorts of trolleys have been associated with the railways; here are three, plus a further one that is not railway-related. Between them, they show just how fine you can print. BRUTEs I posted about these a while ago , but had no images of them painted. Not that they are painted that well - you can see some places the paint has filled in holes in the mess. Porter's Trolleys These are the four wheel version. One of the great things about 3d printing is it is so easy to make little variations. I created a basic trolley with the pull-bar raised, then another with it down, and then for each created versions that are also laden. For once, the photo really shows the model off well. You can see the planking on the left-most trolley, and the bird cage on the near right-trolley is much easier to see here than when holding it. I considered putting an owl in the cage, but how would I paint it? A further set of variations... I removed the bars at either end, and changed the wheels, then load