Posts

Showing posts from March, 2023

Preston City Mission

Image
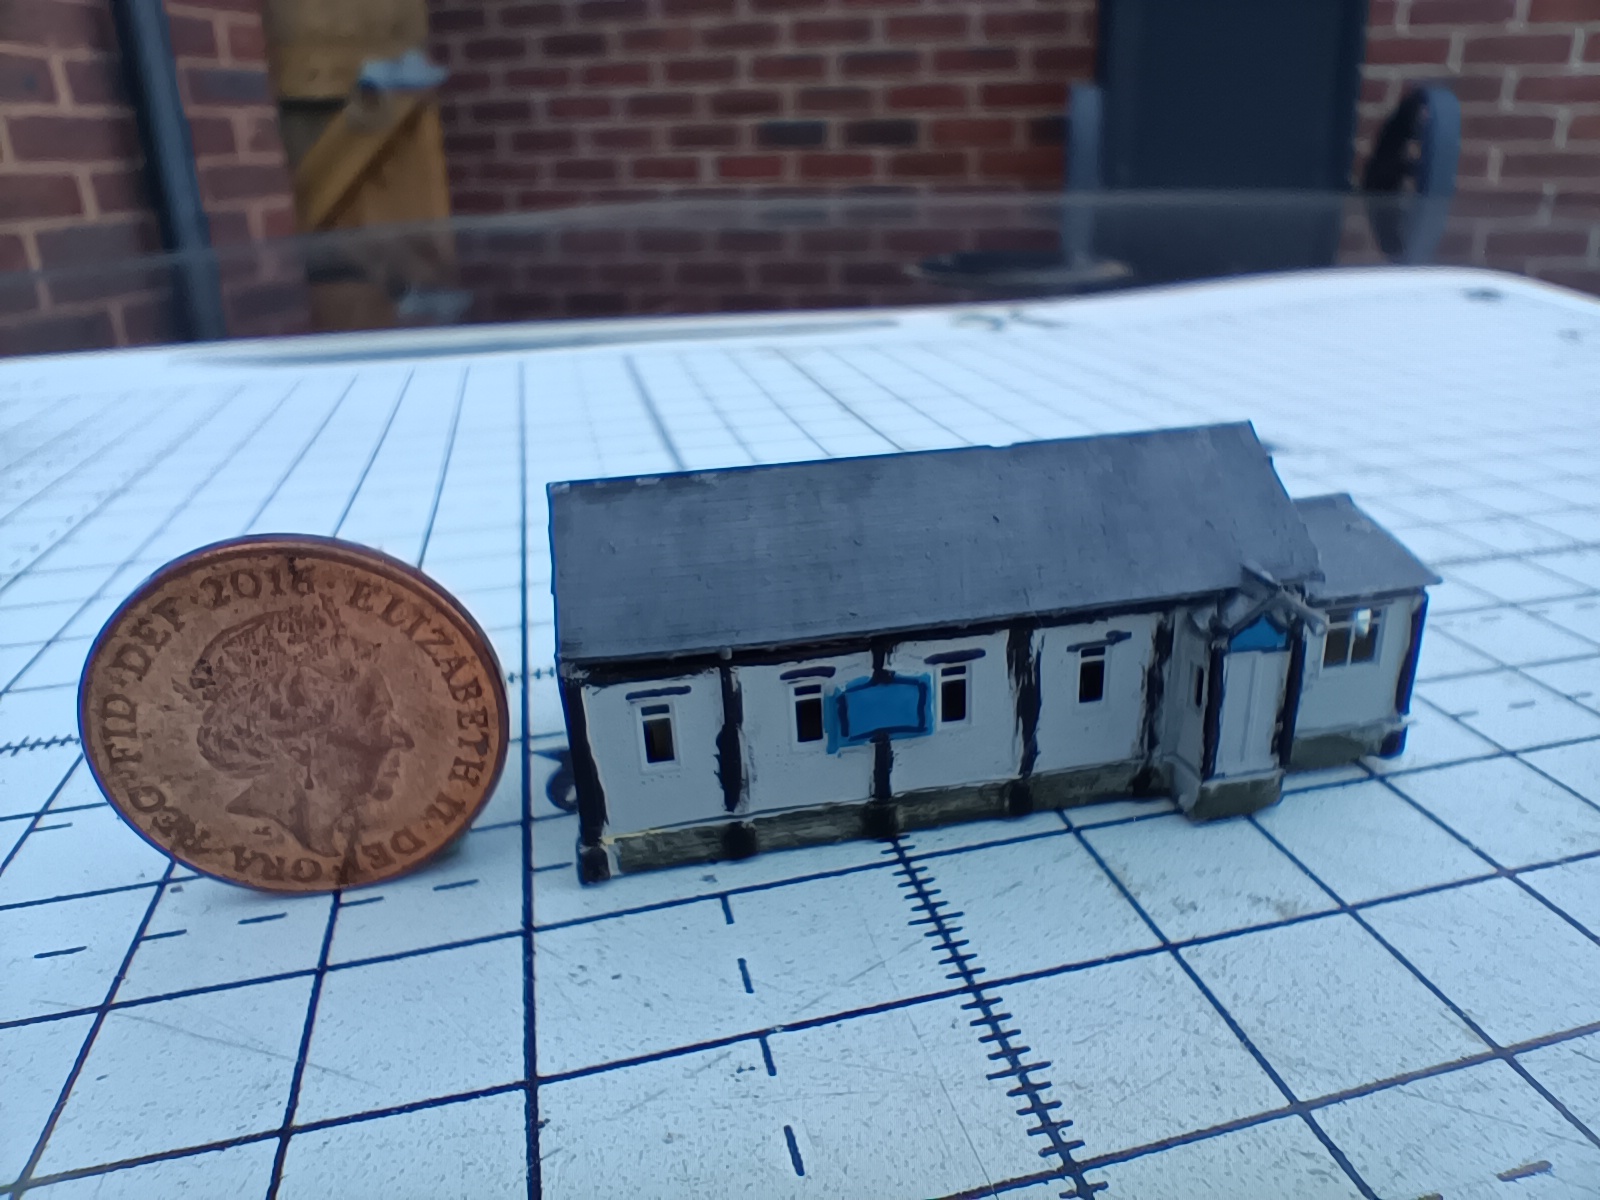
This is a delightful building on Corporation Street, as it meets the Ring Road, and I guess in the only wooden building left in Preston. I miscalculated the scale, and this is it at 1/420 scale (approximately T gauge), and just 5 cm long. The prototype was built in 1900 as the Railway Mission. Previously services had been held on the station platform allowing railway workers obliged to work on Sunday to worship. Some time around 1980 British Rail decided to sell the land, and it looked like it would go to a property developer, but the church raised funds to buy the plot , and it became Preston Evangelical Mission, and at some point later Preston City Mission (when Preston became a city in 2002?). It seems to have survived at least two further plans to redevelop the area, in ca 2009 and 2019. There is an photo here of it from before the Ring Road was built here . This one, in colour, from ca. 1970 here  must be after the Ring Road was built, but with a building to the left still standi

3d Printing Workflow

Design your model in Blender or whatever. Make it hollow, with holes that will allow resin/air to enter and exit from the bottom (that is, the bottom in your slicing software, which will be the top when printing). Walls should be 1-2 mm thick. Nothing should be more than 5m thick. Details that jut out from a wall can be as thin as 0.1 mm, details not attached should be no smaller than 0.2 mm. STL File Export it as an STL file. If you are printing it as a number of parts, I suggest each part in a separate STL file, as it makes it easier to just print one part later if required, plus you have more freedom to arrange the parts on the build-plate of your printer. In Blender, I would put the parts in different collections , and then hide the other parts. Press A to select everything, then when you export tick the "Selection only" box on the right side. If you do export several parts as one STL file, make sure they are all more-or-less on the same baseline, otherwise you will need

Canal bridge

Image
There are numerous bridges of this design along the Lancaster Canal, and I assume across the country. I am particular pleased with how well defined the brickwork is. Image of the prototype for reference.

Run-down Barn

Image
 This is based on a barn in Higher Walton. It did not print quite properly, one end started to fall off the build plate. So we will say the land rises up there... The roof is corrugated iron, and you can see not just the corrugations, but the sheets too. The annex at the end is pretty much a ruin, and turned out pretty well. The holes in the bricks in a diamond pattern under the gable ends are presumably for ventilation, and are a common feature of local barns. This is the prototype. I did not include the basketball hoop.

List of Items Required When 3d Printing

This is based on my experiences with the Elegoo Saturn 8k. I recommend you have: Resin: None is included so obviously required. I found I got through the first 1 kg pretty fast, but it slowed down once I knew what I was doing. iso-Propyl alcohol (IPA): For washing. Again, I got though 1 kg pretty fast, but the next 5 kg lasted well over a year. Leave to stand, and the resin will settle out. Decant off 90% of the IPA into one container, and the rest - which will have some resin it it still - into another container for further settling out. Mesh filter papers:  Included with the Elegoo printer, and it comes with a good amount of them. Used to filter the resin which is required whenever something fails to print. Filter funnel: The printer came with mesh filter papers, but you do need a funnel. I would suggest a 12 to 15 cm diameter plastic funnel. Gloves: The printer came with disposable gloves. You need to get nitrile gloves or the equivalent; latex gloves and normal washing up gloves

Wilkos

Image
My next model in Wilkos, in low relief. the prototype is on  Fishergate, Preston, and used to be C&A, and at some point I will print a C&A version. It was built ca. 1960. The shop goes back a very long way, and from the outside is very dull apart from the front. The windows need glazing and interior detail on the ground floor. My painting skills are not up to the logo, through it is embossed. The prototype can be seen here. An alternative version, as it was ca. 1980.

Copley Hill plate girder bridge

Image
 My second decent print is a bridge (the bus is not 3d printed). This is based on a prototype at Copley Hill in Leeds. I managed to print it under-scale - it should be 50% bigger. Aside from that, I am pleased with the result. I am still having issues with parts dropping off. Only two of the four wings printed and there should be sections to go between the tracks that also failed. I am wondering if the zero is too low?

LSWR good Shed: My First 3d Print

Image
This is my first proper success. The first actual print was a pair of rooks from a file included with the printer. I tried to print Preston City Mission, but the supports swapped the model, and it will need to be redesigned with the roof separate. I also printed a "tip-air" hopper body, which was fairly successful, and may be the subject of a later post. This is using an Elegoo Saturn 8K. This took three attempts, and the issue is supports. The parts are printed 5 mm above the build plate, on lots of little legs, and if the legs are too thin or too few, the part drops off during the print. I found, using ChiTuBox, you need intermediate supports with additional heavy supports at the corners of anything of any size. This is the second attempt, which did not have good enough supports and the main part fell off. After printing, the parts are washing in iso-propyl alcohol, then UV cured for about 5 minutes - I have an Elegoo curing station to do that. Then the supports are removed